A Step-by-step guide On How to use Writegenic AI
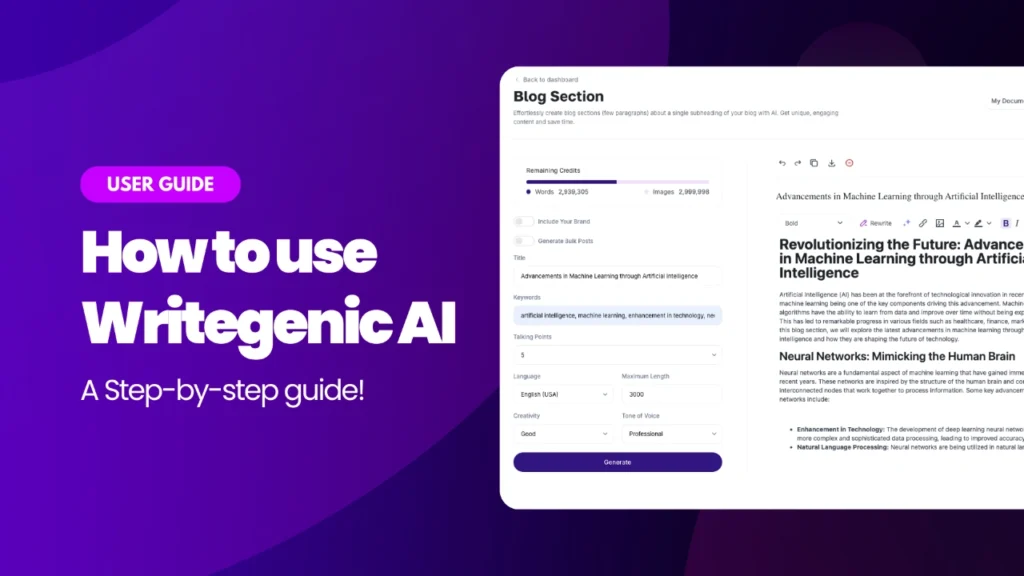
Writegenic AI is an innovative platform for AI-powered content creation. It leverages advanced AI technology to generate high-quality, engaging, and SEO-optimized content tailored to your specific needs. In this step-by-step guide, we are going to study the basic functionality of how to use writegenic AI. For that, we must get to know what writegenic AI is.
Writegenic AI offers the powerful ready to use Project Management templates with makes WriteGenic AI very famous among professionals to enhance their productivity of project management.
In the fast-moving digital world, developing project management reports and premium content with greater speed and at maximal efficiency is a need for projects, businesses, marketers, and content creators alike. It is at this point that AI-driven reports or content generation tools come into the picture, of which one fine example is the Writegenic AI engine. Be it developing interesting blog posts, personalized emails, or compelling promotional materials, with Writegenic AI, content creation just got a whole lot easier, making your copy fully search engine optimized to command audience engagement.
This tutorial will give you a deep walkthrough on how to work with Writegenic AI from signing up to the creation of your very first content piece. We’ll then proceed to review the features, advantages, and practical tips on how to make your use of this platform as good as it gets.
What is Writegenic AI?
Writegenic AI is an AI-driven content creation platform engineered to help businesses, projects and individuals alike create high-quality, engaging, SEO-optimized content in record time. Advanced algorithms on the platform enable text generation based on user inputs and make the creating of a blog post, promotional e-mail, content for social media, product description, and more that much easier.
Writegenic AI is designed for content creators who seek to scale without sacrificing quality, with features such as keyword integration, customizable writing styles, and automated SEO suggestions.
How to Use Writegenic AI for Project Management and other Content Creation?
There are number of reasons why Writegenic AI may be an asset in literally any business, project or content creator. Following are some examples include but are not limited to:
- Efficiency: With AI-powered editing tools like Writegenic AI, content creation is way faster than manual writing. In turn, this will free up time for more important things.
- SEO Optimization: In-built keyword research and integration mean your content is ready for search engine optimization.
- Diversification: Long-form blog content, short social media updates, or personalized emails, with Writegenic AI solves every kind of content.
- Personalization: Be it the tone, style, or voice; all can be changed with Writegenic AI to adapt it to your brand.
- Economical: Since businesses now automate the creation of content, money will be saved instead of hiring a certain writer or making in-house content.
How to Sign Up for Writegenic AI
Getting started with Writegenic AI is simple. Follow these steps to sign up:
-
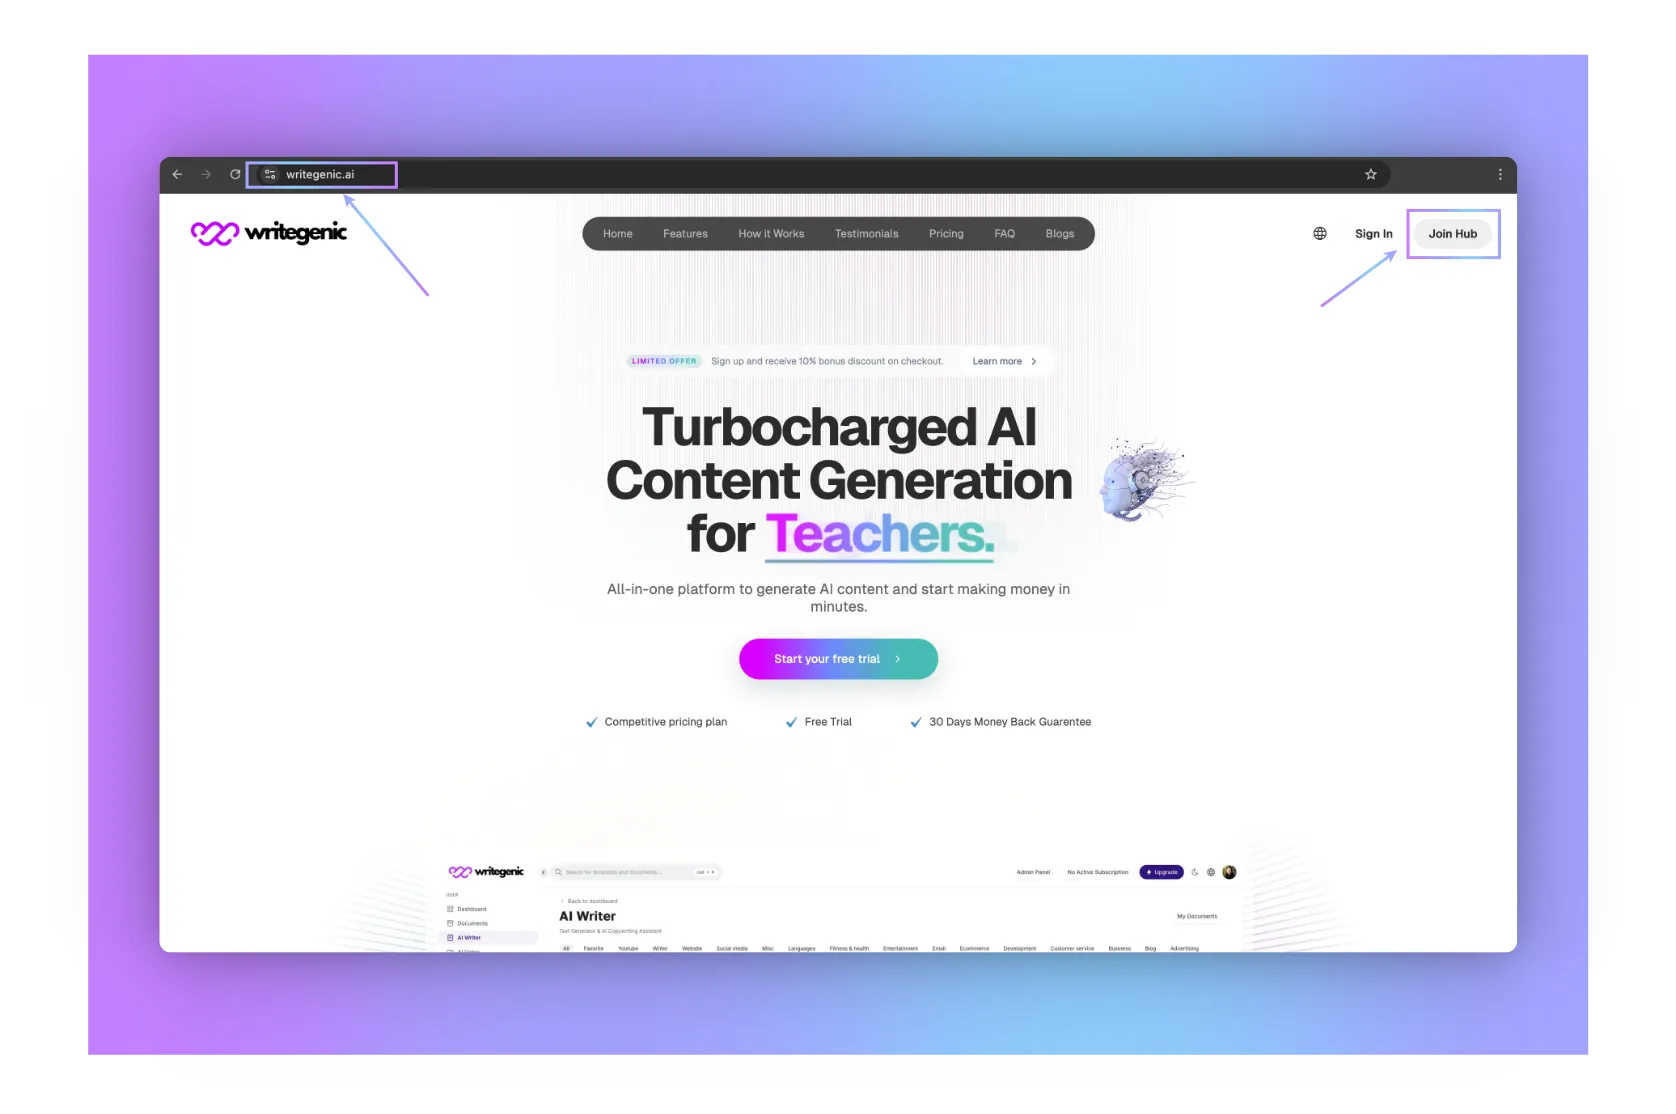
Visit the Writegenic AI Website:
Head to the homepage by typing https://writegenic.ai into your browser.
-
Click on “Join Hub”:
To the right top, from the homepage of the site, there’s a button saying “Join Hub”. It begins the application process.
-
“Sign Up” page:
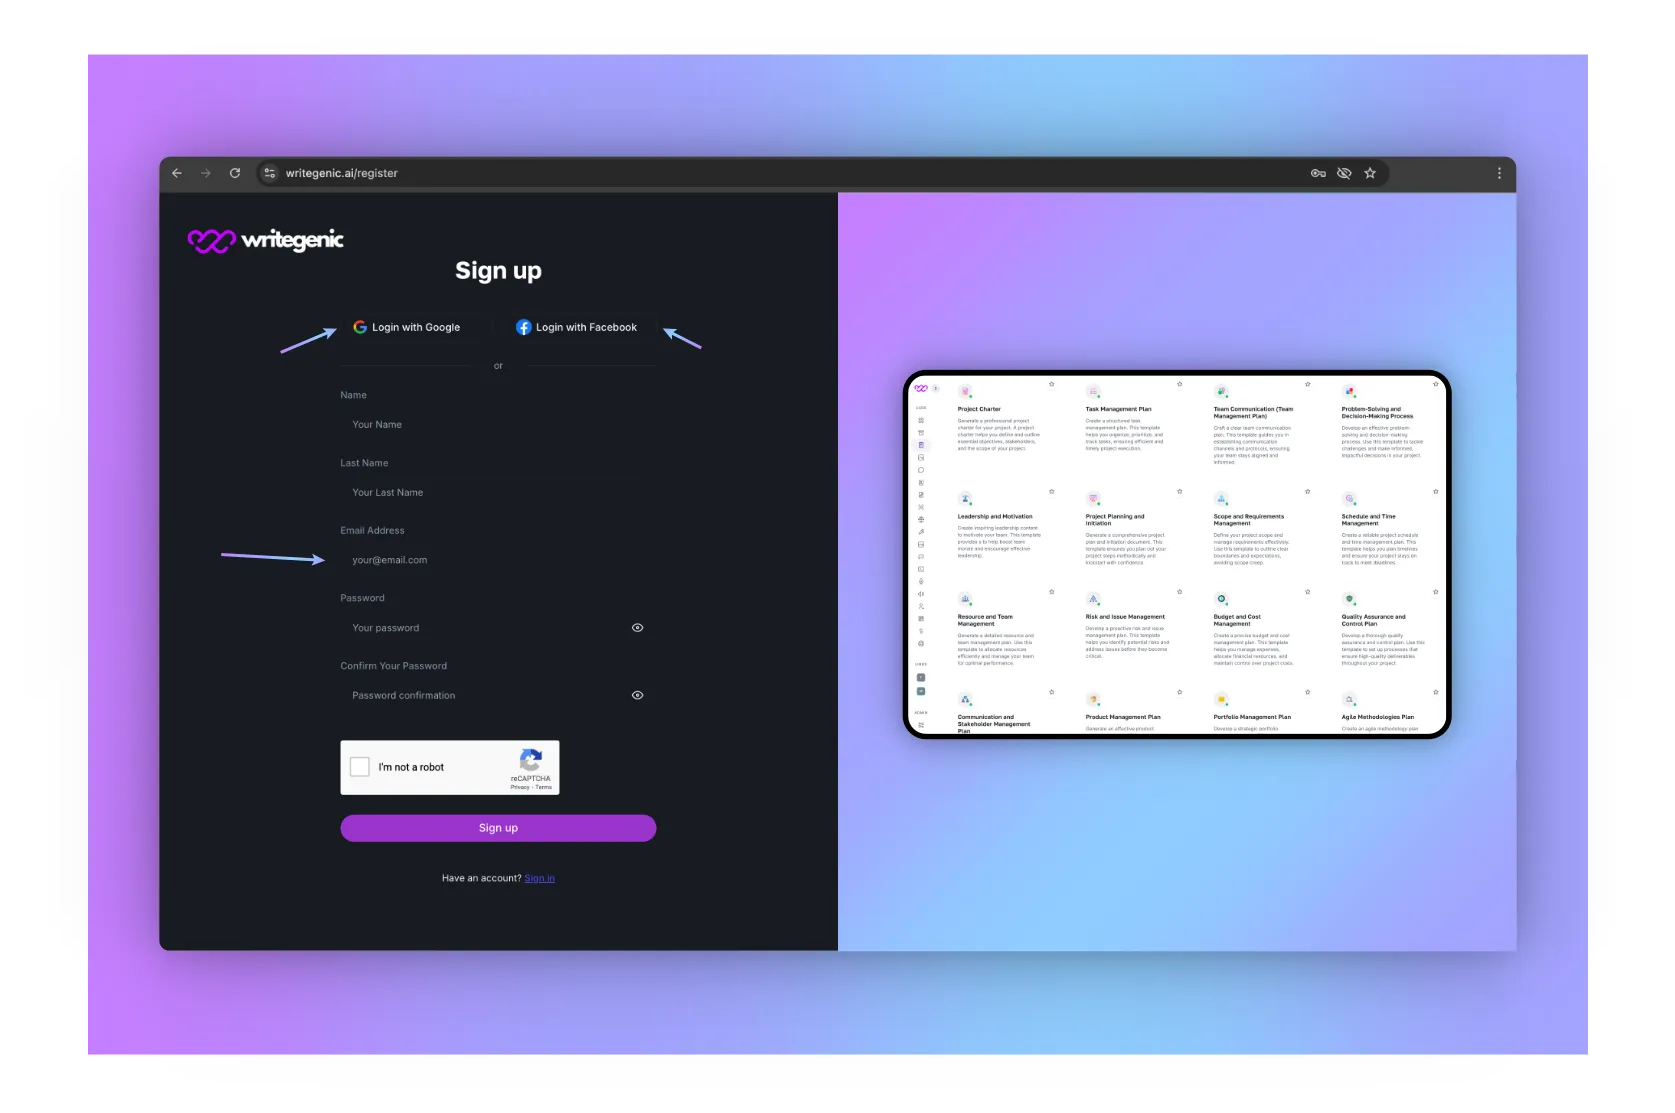
Another page opens, which is named “Sign Up” and where you’ll have three options to create your account :
-
- Login with Google
-
- Login with Facebook or
-
- Login with another email address: Provide your first and last name, email address, password, and confirm your password. Then, simply check the “I’m not a robot” box to complete the security verification, and click the “Sign up” button to finalize your registration. Once done, you’ll have immediate access to the powerful tools offered by Writegenic AI,
-
-
Verify Your Email:
Upon completion of the sign-up, you shall receive a verification email in your inbox. You need to open it and confirm your registration by clicking on the link provided. This is an important step you will have to take in order to activate your account and be able to use all functionalities of Writegenic AI completely. If this email isn’t in your inbox, please make sure to look inside your spam or junk folder!
-
Log In and Start Creating:
Once your account is verified, you can log in to the platform and start generating content.
-
Choose Your Plan:
Writegenic AI offers 7 days free trail and various pricing tiers based on your needs. Select the plan that suits you, whether it’s for personal use or a business subscription.
Know your Writegenic AI Dashboard:
Onboarding:
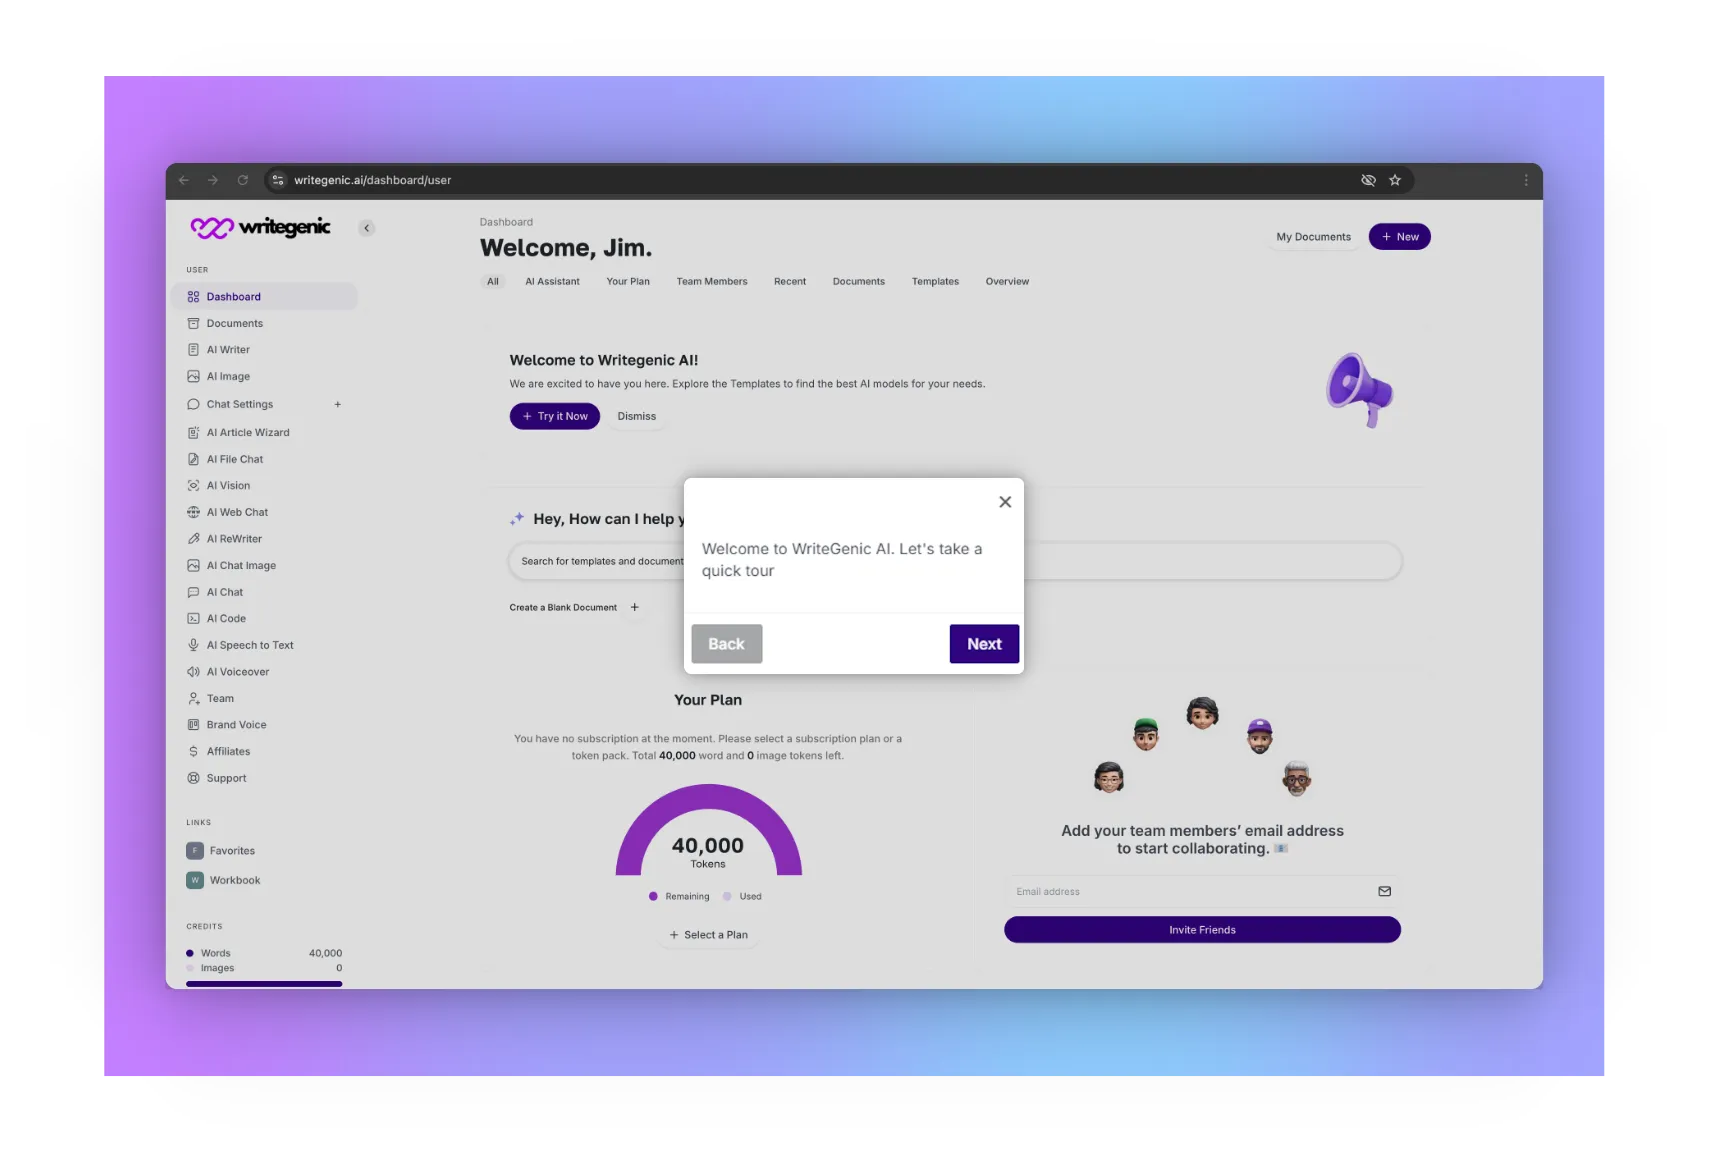
After logging in, you’ll be taken to the Writegenic AI dashboard. The dashboard is user-friendly, with intuitive navigation options that make it easy to create, edit, and manage your content projects.
-
-
Getting Started:
There is an onboarding session for new users. Welcome to WriteGenic AI. Let’s take a quick tour. Click on the Next button after that.
-
-
-
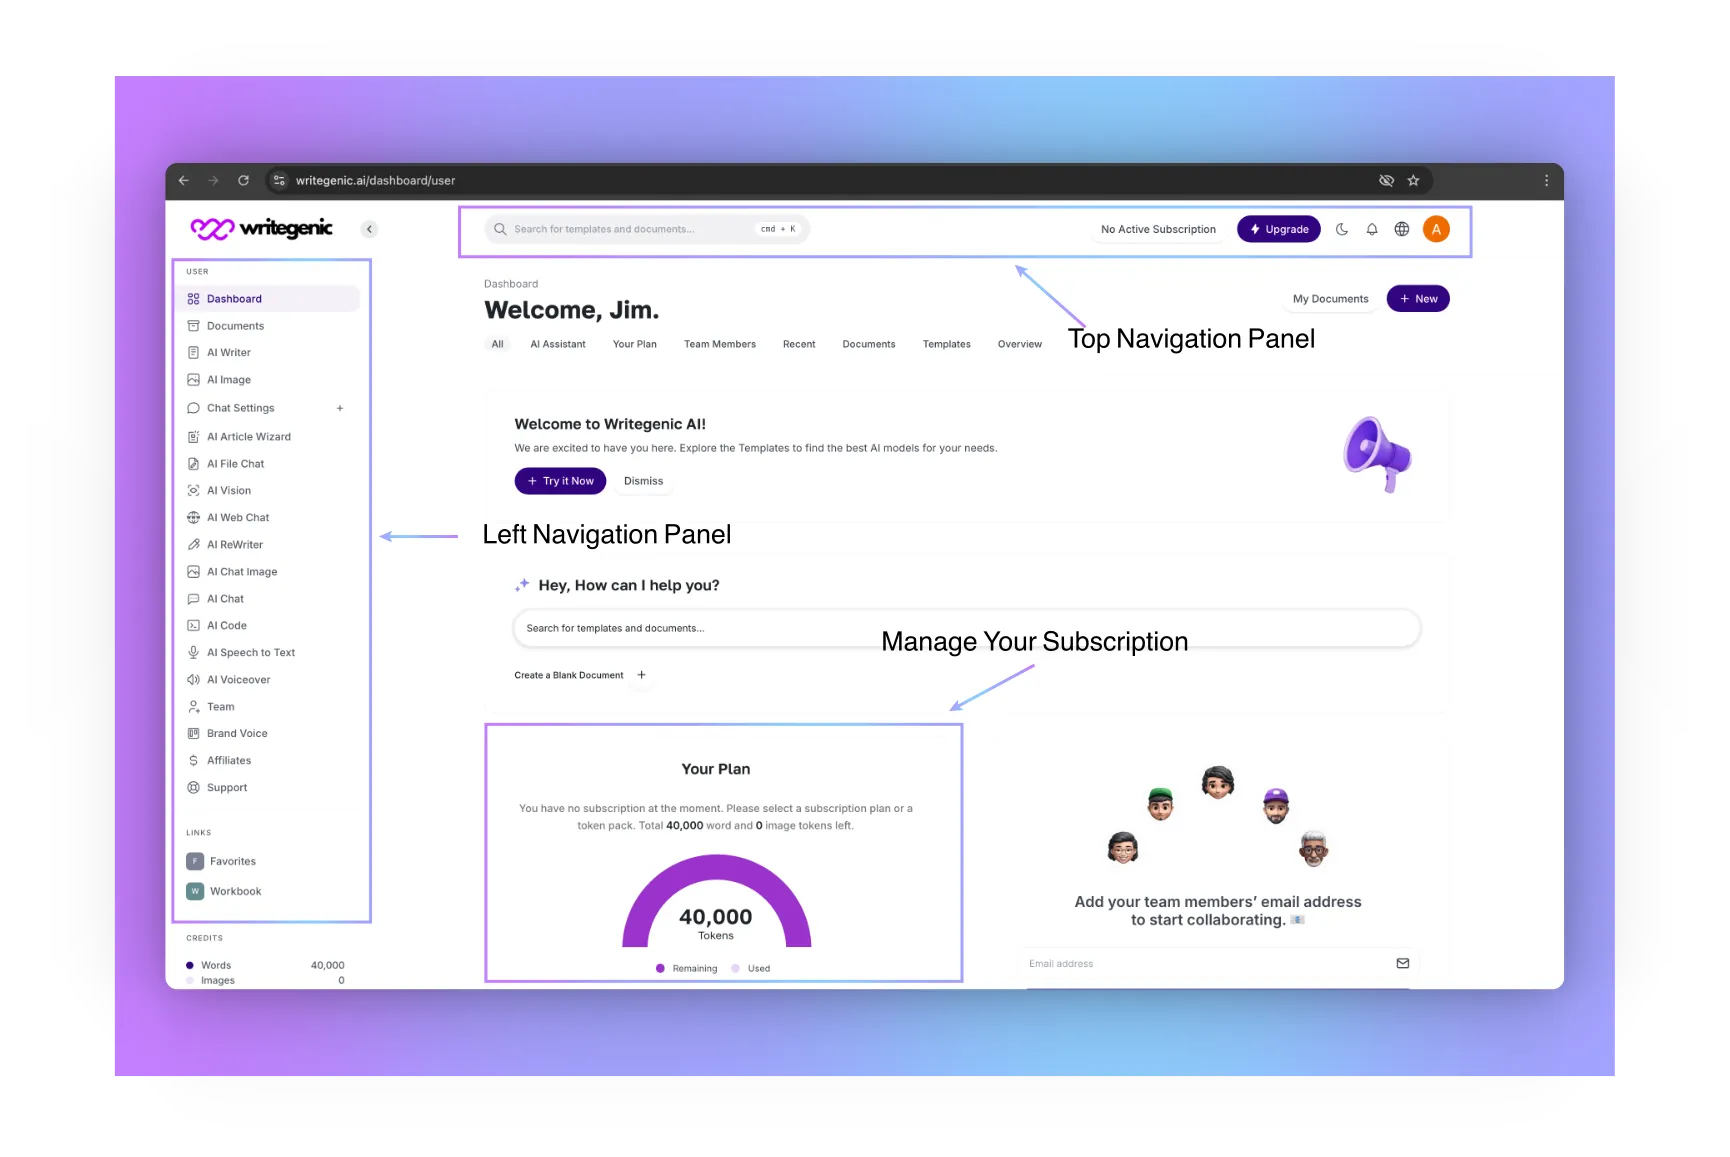
Left Navigation Panel:
It will show you left-hand side menu where to find the tool and templates: A great tool for using the Text Generator & AI Copywriting Assistant. Click on the Next button after that.
-
-
-
AI Code:
Now it will highlight AI Code which will help you to Generate high quality code in seconds. Click on the Next button after that.
-
-
-
Choose your Subscription Plan:
This is the area from which choose the plan that suits your needs and start creating right away. Click on the Next button after that.
-
-
-
Affiliate Program:
You can start referring friends & followers to get on board Writegenic AI while you start enjoying 30% recurring commissions.
-
Navigating the Left-Hand Side Menu
The central hub of WriteGenic AI ecosystem: an entry point for all the powerful AI tools and features software has to offer. Whether it’s document creation, image creation, the setup for AI-driven conversations, or even team management, this menu will walk you through each process with ease. Each of these sections is designed uniquely to facilitate seamless workflows, equipping you with everything you may want for easy content creation, management, and optimization. Let’s go through each option quickly so that you are familiar with what tools are at your fingertips! Here is a brief introduction to each of the items in navigation:
-
-
Dashboard:
-
This will be your default start, where you’ll have easy access to main features and an overview of your activity.
-
-
Documents:
-
This will enable you to store, create, and manage all your AI-generated documents in one place. You can locate, access, edit, and reorganize your content with ease to ensure all work you create is organized and accessible when you need it.
-
-
AI Writer:
-
Generate written content instantly using our powerful AI writing tool.
-
-
AI Image:
-
Create AI-powered images to enhance your content and projects.
-
-
Chat Settings:
-
Customize your chat preferences and configure settings for AI-powered conversations.
-
-
AI Article Wizard:
-
Easily generate full-length articles with guided assistance from our AI wizard.
-
-
AI File Chat:
-
Interact with files using AI-driven chat functionality for quick insights and summaries.
-
-
AI Vision:
-
Leverage AI to analyze and interpret images, helping you derive valuable information.
-
-
AI Web Chat:
-
Enhance your website by adding AI-powered chatbots to engage and entertain visitors while improving their overall user experience.
-
-
AI Re-Writer:
-
Quickly rephrase or enhance existing content with AI-powered rewriting tools.
-
-
AI Chat Image:
-
Generate or edit images using AI chat-based commands for creative control.
-
-
AI Chat:
-
Engage with an AI chatbot for dynamic and interactive conversations.
-
-
AI Code:
-
Write and optimize code with AI assistance for faster, smarter development.
-
-
AI Speech to Text:
-
Convert spoken words into text effortlessly with advanced AI speech recognition.
-
-
AI Voiceover:
-
Create professional voiceovers from text using AI-generated voices.
-
-
Team (Add a team member):
-
Manage your team by adding new members to collaborate on projects seamlessly.
-
-
Brand Voice:
-
Establish and maintain a consistent tone of voice for your brand by setting up the guidelines for your brand’s voice. It is about setting parameters for language, style, and messaging to make sure all content created would resonate with your target audience and reflect your identity.
-
-
Affiliates:
-
Log in with the affiliate dashboard and manage your referrals plus track commissions. It’s a tool that will let you know how your affiliate is doing, the status of your referrals, and the commission you have accrued for easy optimization of affiliate marketing.
-
-
Support:
-
Get help with any questions or issues through our dedicated support channel.
Understanding the Top Bar Navigation
The top bar provides quick access to essential tools and settings for a smooth user experience. Here’s what each option offers:
-
-
Search Bar
Use the search bar to quickly find the AI templates you need. Simply type in keywords, and you’ll instantly see relevant options to streamline your content creation.
-
-
-
Your Subscription Info
View your current subscription plan briefly. This section shows which subscription tier you’re on and allows you to monitor your usage.
-
-
-
Upgrade:
If you’re ready for more features or increased limits, click the upgrade button to easily switch to a higher subscription that fits your growing needs.
-
-
-
Dark Mode/Light Mode Toggle Icon:
Toggle between dark mode and light mode based on your preference, ensuring a comfortable viewing experience no matter your environment.
-
-
-
Notification Icon:
Stay up to date with important updates, messages, and system alerts by checking your notifications here.
-
-
-
Language Selection Icon:
Choose your preferred language for navigating the platform and interacting with the AI tools, ensuring a personalized user experience.
-
Profile Photo:
Click on your profile picture to access account settings, manage your profile, and adjust your personal preferences for a tailored experience.
-
How to Use Writegenic AI’s Templates?
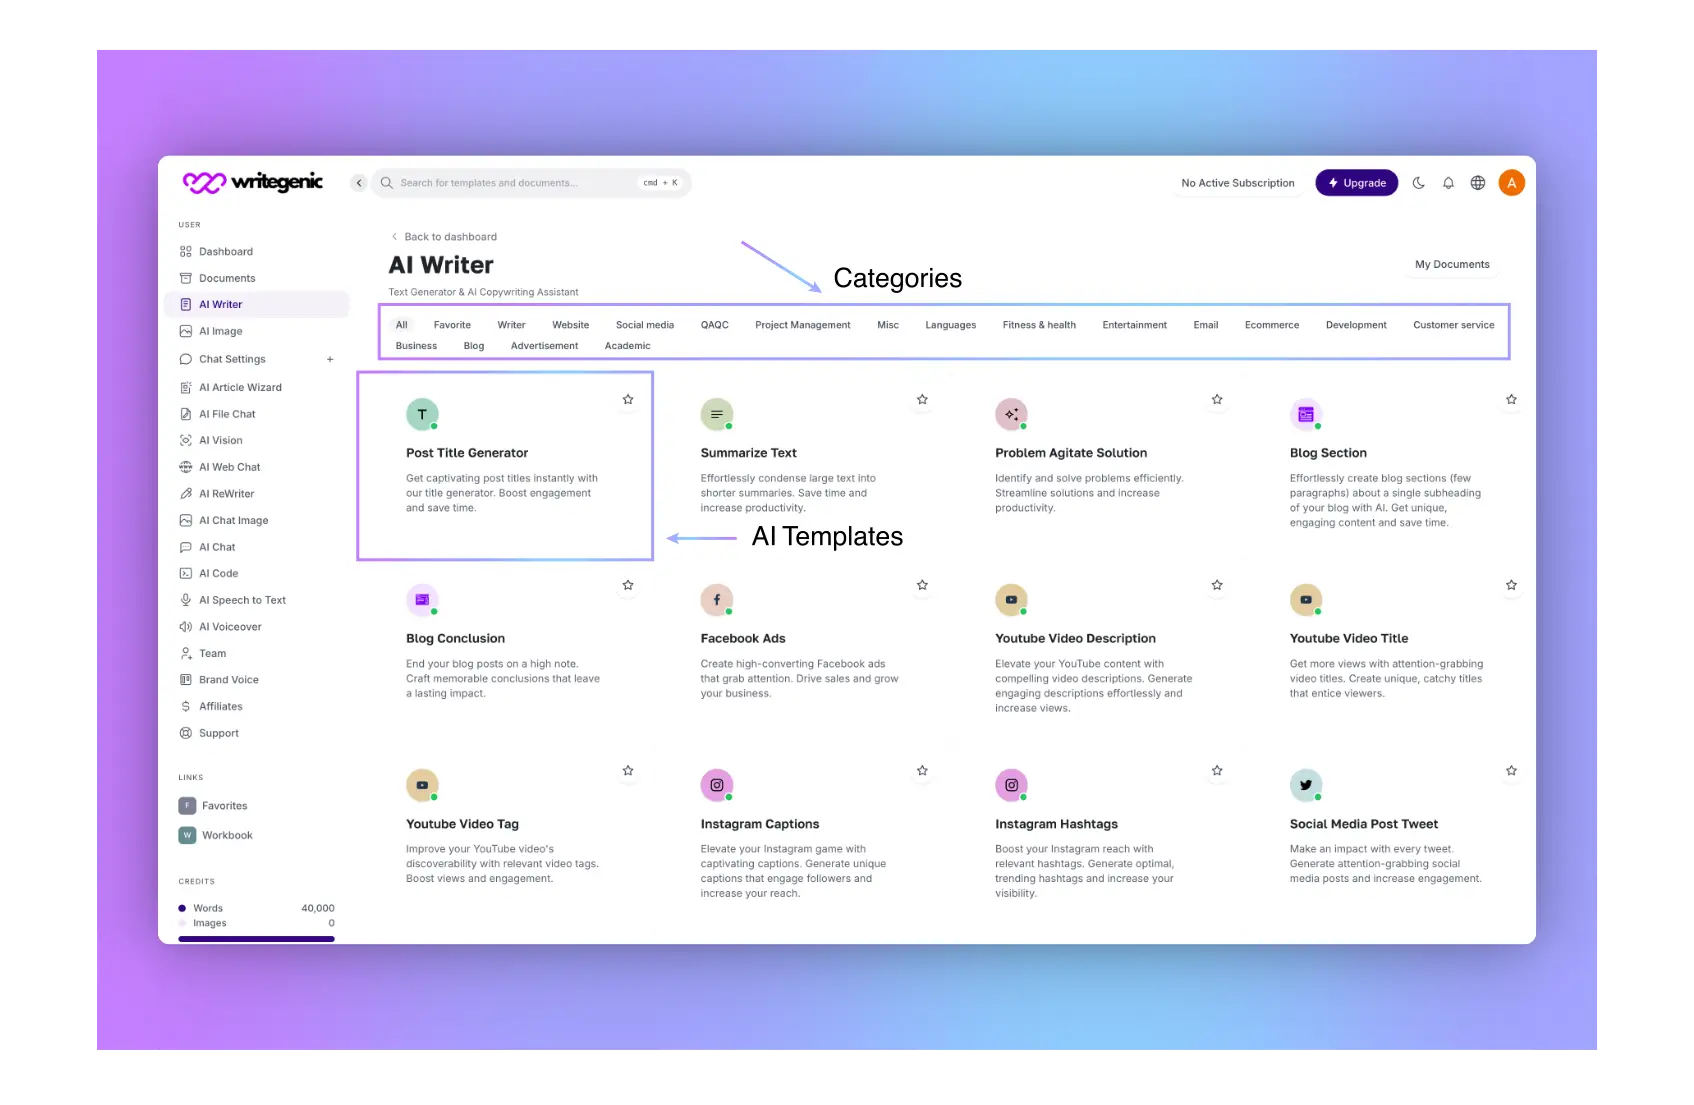
The AI Writer section is your one-stop destination to create a wide range of content with AI. There are 200+ AI templates you can create your tailored content with. Here is how you can work your way through and utilize this powerhouse in full potential.
-
Accessing AI Writer
From the left-hand navigation panel, click AI Writer. You’ll be taken to the various template options you have with AI. Everything from articles and blog posts to emails to product descriptions is fitted with templates that will help create such content with speed but efficiently.
-
Exploring Template Categories
Above the templates, you will notice several category buttons. These categories organize the templates by function. Examples of such categories include “Marketing,” “Project Management,” or “Social Media.” Click on any category to filter and display only the templates related to that specific category. This shall make it easier for you to find the right tool for your content needs.
-
Managing Your Saved Work
On the top right side of the AI Writer page, you’ll see a button that says “My Documents”. Click it, and it will bring you to your saved documents where you can view and edit everything you have written so far. Additionally, you get to manage all of the content you have worked on in one place. It’s just one quick and easy way to track your work and reach it anytime you want.
What you need to do is just follow the steps outlined below, and in no time, you will be generating high-quality output as per your exact requirements. The design of the “AI Writer” is built for ease of use and flexibility, ensuring that the content creation process is both faster and more effective.
Step-by-Step Guide to Writing Your First Content
To explain this, an example is taken wherein a detailed Project Execution Plan is created using our AI template. Just follow these simple steps to create a professional structured document in minutes:
-
Select an AI Template:
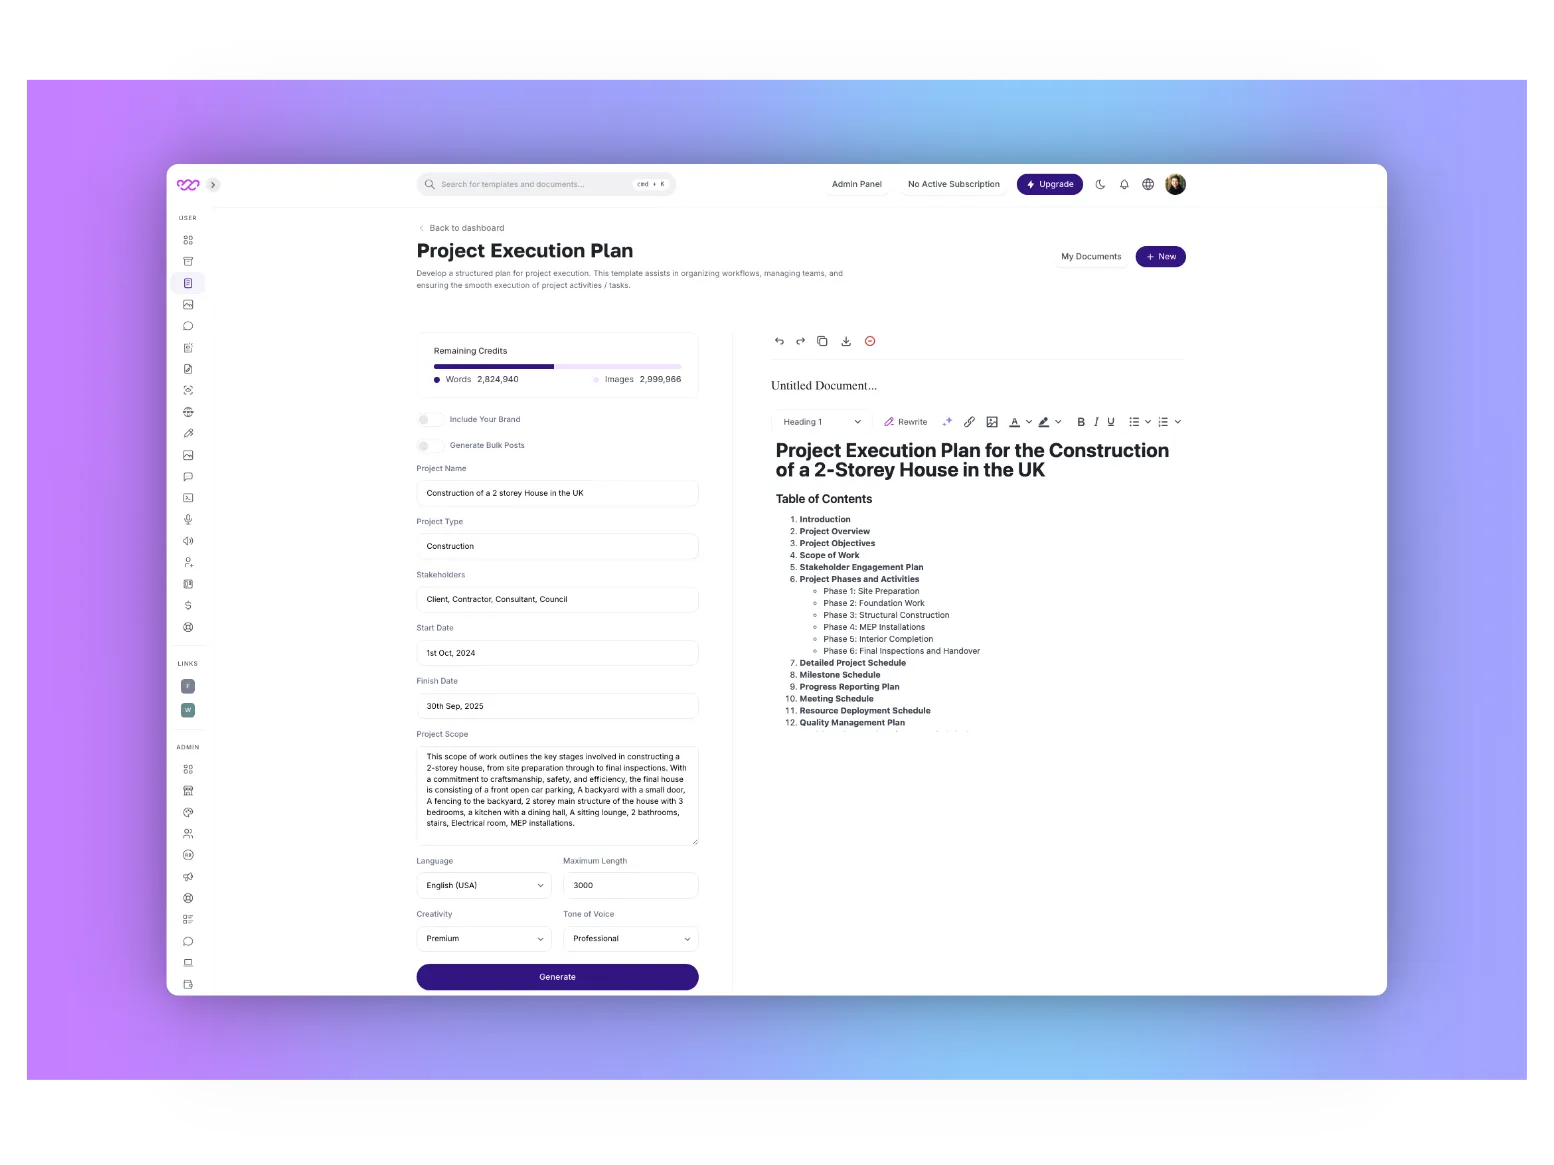
As an example, we are using “Project execution Template”. Under the Project Management category in the AI Writer section, click on the “Project Execution Plan” template. This template helps you organize workflows, manage teams, and ensure the smooth execution of project activities.
-
Fill in the User Input Fields (Left Side):
After selecting the template, you will be prompted to add some details of your project. Please fill in the following information:
-
Project Name: Enter project name. For example, you might use “Construction of a 2-Storey House in the UK.” This title will help you keep your projects organized and give context to the content generated.
-
Project Type: Describe the type of project, for example, “Construction.”
- Stakeholders: Mention all the major stakeholders, including “Client, Contractor, Consultant, Council.”
- Start Date and Finish Date: Enter the project’s timeline (e.g., Start: 1st Oct 2024, Finish: 30th Sep 2025).
- Project Scope: Give a short description of the project scope. For instance, explain stages a project needs to go through, such as “This project includes site preparation, structural construction, inspections, etc.
-
-
Advanced Options:
To refine the content, use the following advanced options:
- Language: Select your preferred language for the output in this field.
- Maximum Length: Choose the desired output length by specifying the number of words.
- Creativity: Adjust the level of creativity based on your needs. You can choose from Economic, Average, Good, or Premium. For this example, Premium was selected for high-quality output.
- Tone of Voice: Choose the tone that fits the style of your document. For instance, a “Professional” tone may be most appropriate for a project execution plan.
-
Generate the Output:
Once all fields are filled, click the Generate button at the bottom. The AI will process your inputs and generate a structured Project Execution Plan on the right-hand side.
-
Review and Save the Output (Right Side):
The document will appear on the right-hand side of your screen. The AI will give you a developed outline complete with Table of Contents and all other sections you might want, such as Project Objectives, Stakeholder Engagement, Project Phases, and more. You may peruse through the content and adjust if necessary.
You can now click the Save button to store the document for future use or export to the format you want. Follow these steps, and you’ll get a detailed, professional-looking Project Execution Plan using the least amount of effort.
How to Edit your Document?
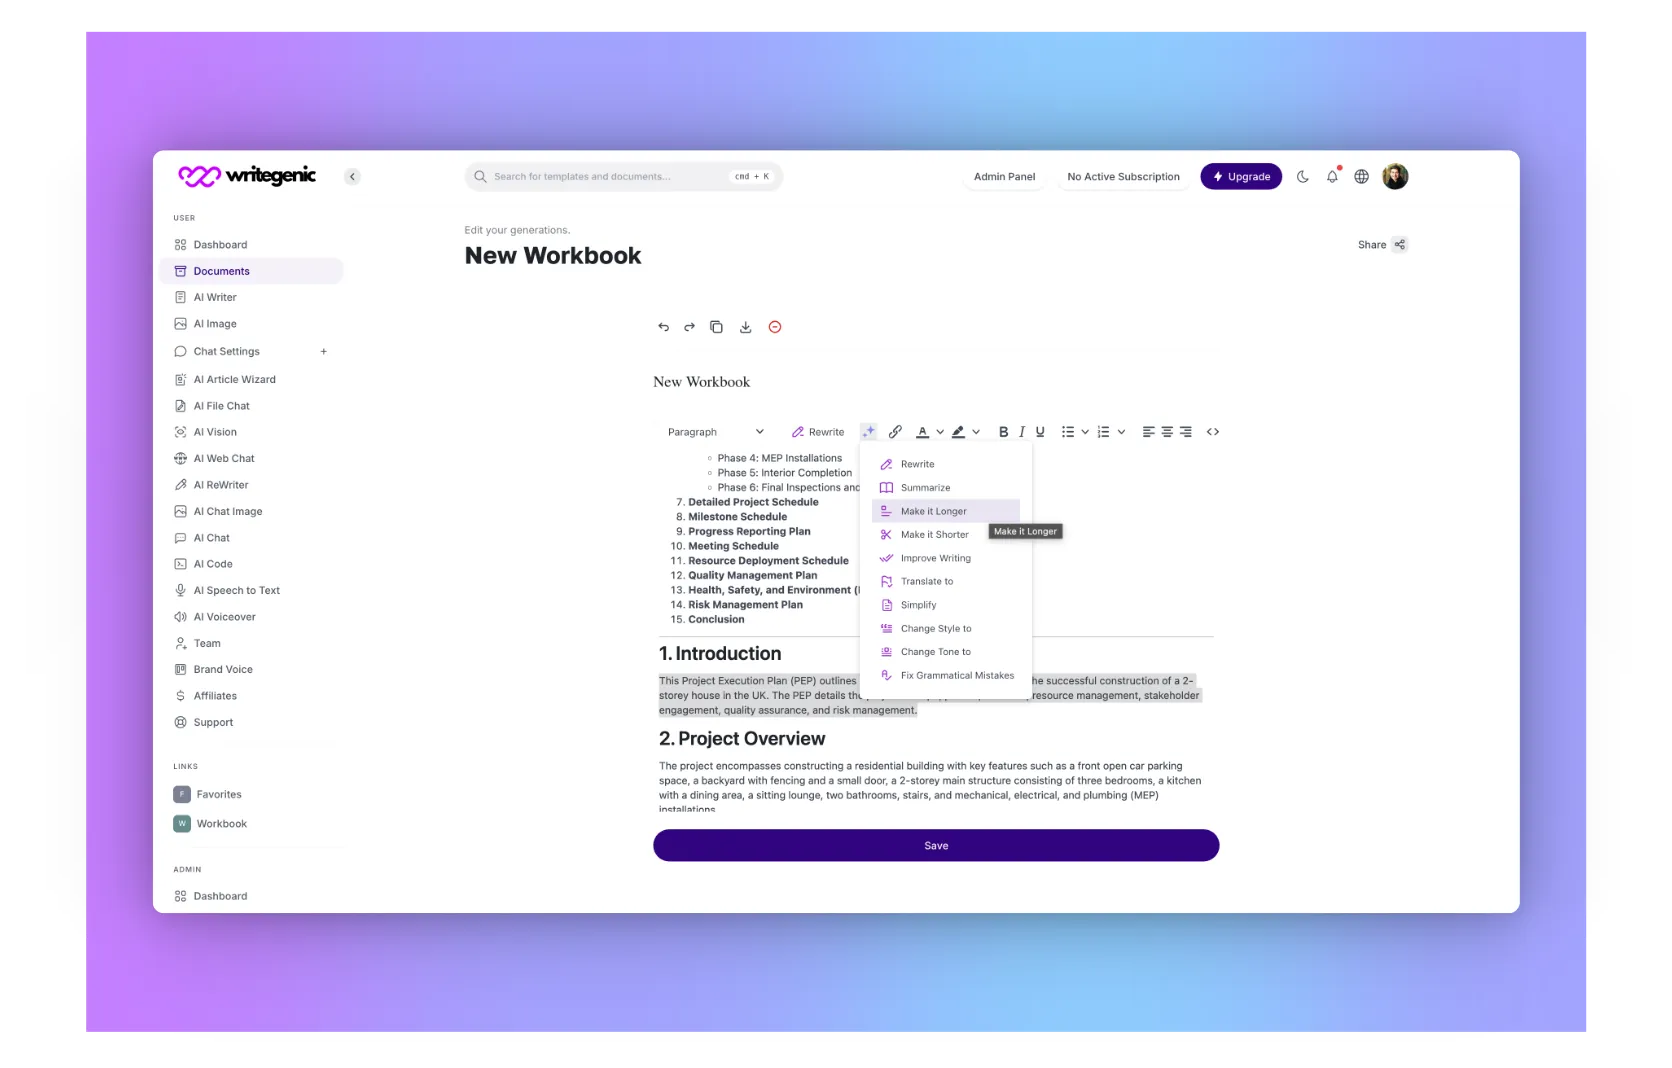
Once you click “Execute” to have the AI generate your Project Execution Plan, you will then see your final output on the right-hand side of your screen. This area has several tools you can use to review, edit, and manage the content.
Top Bar Functions:
-
Undo and Redo Buttons:
- Undo: If you make any changes and want to revert to the previous version, click the Undo button (curved arrow pointing left).
- Redo: To reverse an undo action, click the Redo button (curved arrow pointing right).
-
Copy to Clipboard:
- Click this button to instantly copy the entire content of your document to the clipboard, allowing you to paste it wherever needed.
-
Download
- The Download button allows you to save your document in your preferred format (e.g., DOCX, PDF). Click on it to export the file and store it locally.
-
Delete
- If you want to remove the current document, click the Delete button. This will permanently delete the content from this session.
-
Save
- After reviewing your document, click the Save button to store it. This will add the document to your My Documents section for future access and edits.
Document Title and Editing Tools:
-
Document Name
By default, the document is titled “Untitled Document…”. You can click on the title to rename it to something relevant to your project, making it easier to organize and locate later.
-
Editing Tools Below the Title:
Beneath the document name, you’ll find a range of editing tools to help you customize your output:
-
Content Structure Dropdown:
This dropdown lets you choose the formatting for different sections of the document. Select between Heading, Paragraph, Block, Div, and other options to format your content as needed.
-
Rewrite Button:
If any section of the document needs rephrasing, you can highlight the desired text and click the Rewrite button. The AI will regenerate the selected content with new phrasing while maintaining the original meaning.
-
AI Assistant Button:
The AI Assistant (AI button) is a powerful tool to fine-tune your document. Highlight any part of the text, and the AI Assistant offers the following options:
-
Summarize:
Condense the selected content into a shorter, more concise version.
-
Expand:
Lengthen the content by adding more detail and context.
-
Translate:
It allows translating the selected text into any other language.
-
Improve:
It enhances clarity and flow in the content.
-
Simplify:
The text should become way easier to read or comprehend.
-
Change Styles or Tones:
Change the style, for instance, formal or casual, or tone, for example, professional or conversational, of the selected text.
-
Fix Grammar:
Grammatically fix selected text automatically.
With these tools, you will be able to customize your Project Execution Plan as much as you want, in order to make it perfectly fit your needs and preferences. When satisfied, click on the Save button, so that later on, you will be able to access this document or export it in any format you prefer.
Using Writegenic AI for Different Content Types
Here are brief descriptions of the various use cases for Writegenic AI:
-
Project Management Documents:
Writegenic AI simplifies how to create project management documents, from structured plans and reports down to proposals. One will be able to develop execution plans, risk assessments, and status updates with ease; hence, all stakeholders in the project are well-informed and on board during its life cycle.
-
Blog Posts and Articles:
Writegenic AI makes the creation of engaging blogs and articles a piece of cake with much ease, targeted at a particular audience. This AI assists in brainstorming ideas, outlining the content, and even writing full articles that enable users to maintain a consistent publishing schedule while focusing on the quality and relevance of the content.
-
Social Media Content:
Writing engaging social media posts becomes easy with Writegenic AI. It helps users create attention-grabbing captions, hashtags, and engagement-driven content for different platforms, hence allowing brands to establish themselves online and connect with their audiences effectively.
-
Product Descriptions:
Writegenic AI enables the creation of captivating product descriptions on features, benefits, and USPs to make businesses more attractive. To this point, the function of persuasive speech, together with SEO optimization, allows potential customers to come and enhance conversion rates on an e-commerce website.
-
Website Content:
Creating impactful website content is essential for any online business, and Writegenic AI streamlines this process. Users can generate homepage text, service descriptions, and about pages that effectively communicate their brand message and engage visitors, ultimately leading to higher user retention.
-
Email Content:
It helps users create professional email content for marketing campaigns or internal communications. It generates attention-grabbing subject lines, persuasive body text, and a clear call-to-action that will make your emails stick in the minds of the recipients and bring desired results.
Advanced Features of Writegenic AI
-
Content Personalization:
Writegenic AI can enable deep personalization of content by using its AI algorithms, which analyze audience data and create content targeted to speak to different segments within your audience. It will be useful in e-mail marketing and promotional campaigns.
-
AI-Driven SEO Recommendations:
Beyond keyword integration, Writegenic AI offers SEO recommendations based on current trends, helping you fine-tune your content for maximum visibility.
-
Multilingual Content Creation:
If your business operates globally, you’ll appreciate Writegenic AI’s multilingual capabilities. You can generate content in multiple languages without losing the nuances of your message.
-
Team Collaboration Tools:
For businesses working in teams, Writegenic AI offers collaboration features that allow multiple users to work on a project simultaneously. You can share content drafts, leave feedback, and track changes—all within the platform.
-
Brand Voice
Brand Voice is going to help you maintain the same tone and style across your written content. By defining what that unique voice for your brand is, you will be in a position to tailor the language to better appeal emotionally and in terms of personality to your target audience. Be it professional and authoritative or casual and friendly, this feature allows you to set certain specifications that the AI will then use in generating content. You just need to provide the voice characteristics of your choice, and it changes how it writes to meet the stipulated preferences of your brand and keep your audience engaged.
-
Affiliate Program
The other excellent passive-income-generating method is the affiliate program, wherein one can easily promote our AI-powered content writing solution. There you’ll get 30% recurring commission on every sale generated through your referrals, providing a handsome stream of income for as long as your referrals stay subscribed to our services. It is quite easy to join-all you need to do is sign up, get your referral link, and start sharing it with your network. You will also be given exclusivity in promotional materials and further support to maximize your earnings. Partner with us now and convert your audience into revenue while promoting revolutionary AI technology!
